Python
Python is a programming language that lets you work quickly and integrate systems more effectively.
1. Open a terminal and Install dependency package.
sudo apt-get update
sudo apt-get install python-dev python3-dev
2. Download Python GPIO library*
git clone http://github.com/TinkerBoard/gpio_lib_python.git
3. Navigate to folder
cd gpio_lib_python/
4. Install Python GPIO library for Tinker Board S
5. Reference codes
sudo python setup.py install
sudo python3 setup.py install
There're few sample codes under this folder /gpio_lib_python/test
*If get “git command not found”, please install git first by apt with follow commands.
sudo apt-get update
sudo apt-get install git
C
C is a general-purpose, imperative computer programming language, supporting structured programming, lexical variable scope and recursion, while a static type system prevents many unintended operations.
1. Open a terminal and download C GPIO library*
git clone http://github.com/TinkerBoard/gpio_lib_c.git
2. Navigate to folder
cd gpio_lib_c/
3. Install C GPIO library for Tinker Board S
sudo ./build
4. Check install success or not
gpio -v
gpio readall
5. Reference codes
There’re few sample codes under this folder
/gpio_lib_c/examples
*If get “git command not found”, please install git first by apt with follow commands.
sudo apt-get update
sudo apt-get install git
To make a simple script create a file with ‘nano led.c’ and input the following code.
Sample LED blink:
#include <stdio.h>
#include <wiringPi.h>

// #define LED 0 matches with ASUS_GPIO 164! This can be checked with command 'sudo gpio readall'.
#define LED 0

int main (void)
{
printf ("TB blink\n");

wiringPiSetup ();
pinMode (LED, OUTPUT);

for (;;)
{
printf ("led on\n");
digitalWrite (LED, HIGH);
delay (500);
printf ("led off\n");
digitalWrite (LED, LOW);
delay (500);
}
return 0;
}
To run the script run the command:
gcc -o led led.c -lwiringPi
To run the newly compiled led run the command ‘sudo ./led’.
Scratch
1.Install
Step1. Install gpio_lib_python from https://github.com/TinkerBoard/gpio_lib_python
Step2. Install NumPy. ex: pip install numpy
Step3. sh ./setup.sh
2.Uninstall
sh ./uninstall.sh
3.Run
Click the Desktop’s shortcut.
4.Broadcast Command
Set Pin Mode
config[pin] (in|input) ex: config11in
config[pin] inpulldown|inputpulldown) ex: config11inpulldown
config[pin] (out|output) ex:config11out
config[pin] (pwm|outpwm|outputpwm) ex: config11pwm
Set Output
gpio[pin] (on|high|true) ex: gpio11on
pin[pin] (on|high|true) ex:pin11on
gpio[pin] (off|low|false) ex: gpio11off
pin[pin] (off|low|false) ex: pin11off
gpio[pin] pwm(0-100) ex: gpio11pwm50
pin[pin] pwn(0-100) ex:pin11pwm50
Shell
GPIO can be used direct from the shell:
# echo 223 > /sys/class/gpio/export
# echo out > /sys/class/gpio/gpio223/direction
# echo 0 > /sys/class/gpio/gpio223/value
# echo 1 > /sys/class/gpio/gpio223/value
# echo in > /sys/class/gpio/gpio223/direction
# cat /sys/class/gpio/gpio223/value
# echo 223 > /sys/class/gpio/unexport
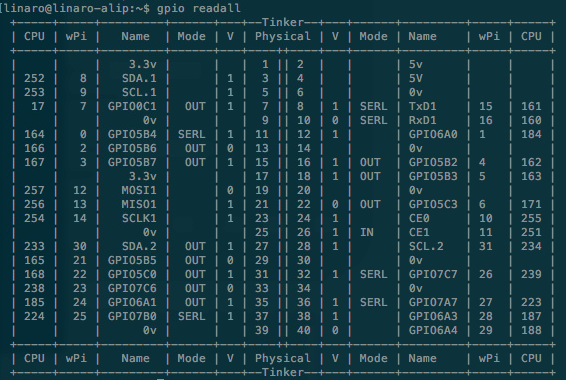
Status of all GPIO can be read as follows:
sudo gpio readall #need GPIO_C_Library
which returns a table:

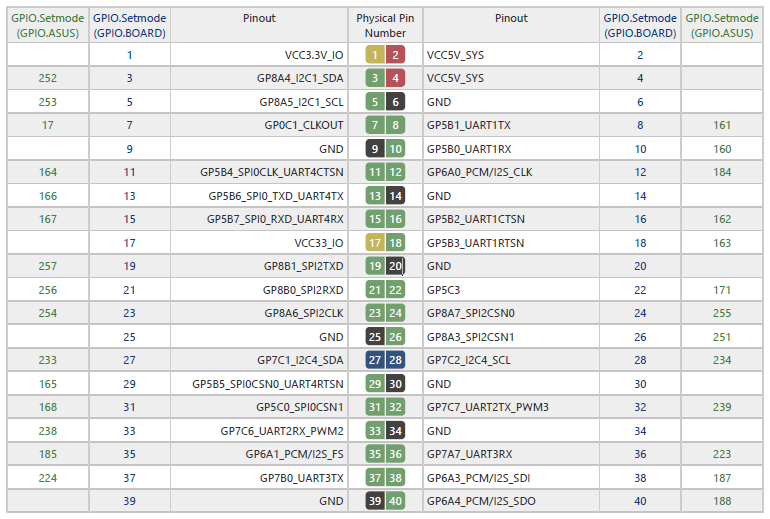
GPIO pinout
If you would like to control GPIO’s SPI, I2C or serial(UART) with Python, it is recommended to use 3rd party or open source Python library, such as spidev, smbus2 or pySerial.

* We strongly recommend that you regularly backup all data stored in the device. ASUS shall not be liable for any damage to or loss of programs or data stored in the Tinker Board series, and shall not be responsible for data recovery, backup, or any charges arising therefrom.
* In no event shall ASUS be liable for any defect, damage or data loss arising from product repair or replacement.
Source : https://tinker-board.asus.com/doc_tbs.html#gpio
보다 자세한 상담을 원하실 경우 STCOM 서버비즈특판팀으로 전화 및 메일 문의 부탁드립니다.
대표전화 : 02) 707-0120 내선 : 8891 (토/일요일 및 공휴일 휴무) | 전자우편 : yj_seo@stcom.co.kr